How to Quickly Fix a Leaky Washing Machine Hose

How to Quickly Fix a Leaky Washing Machine Hose

Table of Contents

Why Do Washing Machine Hoses Leak?

A leaky washing machine hose is a common problem. It can happen because the hose is old, cracked, or not screwed in tightly. If water is dripping behind your washer, it’s a good idea to check the hoses right away. If not fixed quickly, it can cause water damage to your floor or walls.

What You’ll Need

Here are some simple tools you’ll need before starting your washing machine hose repair:

  • Adjustable wrench or pliers
  • Bucket or towels (to catch water)
  • New washer hose (if needed)
  • Teflon tape (optional)
  • Flashlight

Step-by-Step: Leaky Washing Machine Hose Fix

Step 1: Unplug and Shut Off Water Supply

Always unplug the washer first. Then, turn off the hot and cold water valves behind the machine to stop water from leaking more.

Step 2: Look at the Hoses

Move the washer away from the wall a little. Use your flashlight to check the hoses. Look for cracks, bulges, or rust. If you see damage, it’s time to change the hose.

Step 3: Tighten Loose Hoses

Use your wrench to tighten the hose connections. Don’t make them too tight—just snug enough so they don’t leak.

Step 4: Replace the Hose (If Needed)

If the hose is damaged, follow these steps:

  1. Put a bucket or towels under the hose to catch water.
  2. Unscrew the old hose from both ends.
  3. Wrap Teflon tape on the threads if you want a better seal.
  4. Screw on the new hose tightly.

Tip: Use stainless steel braided hoses if possible. They last longer than rubber ones.

Step 5: Turn the Water On and Test

Slowly turn on the water. Look for leaks. If all is dry, plug the washer back in and run a short cycle to test it. If there’s no leak—good job! You just finished your leaky washing machine hose fix.

When to Call a Professional

If the leak keeps happening even after replacing the hose, it might be a bigger issue inside the machine. That’s when it’s time to call the experts.

King Appliance Repair Company in Ottawa is here to help. We fix all washer problems and offer same-day service. Our pros can also help if your washer won’t spin, or if you’re dealing with a clogged washing machine drain.

Preventing Future Leaks

Here are easy tips to stop leaks before they start:

  • Check your hoses every 6 months.
  • Replace them every 3–5 years.
  • Use steel braided hoses for better safety.

Thinking of buying a new washer? Check out our guide on front-load vs. top-load washing machines.

Final Thoughts

Fixing a washing machine hose leak is easier than you might think. With just a few tools and 15–30 minutes of your time, you can stop the leak and avoid a big mess.

Still need help? Reach out to King Appliance Repair Company today. We’re local, reliable, and ready to help you get back to clean laundry—fast!

Need urgent help?

📞 Call: 613-699-1999
🌐 Visit: kingappliancesrepair.ca
🛠️ Trusted. Local. Reliable.

A professional appliance repair technician fixing a front-loading washing machine with tools in a clean home environment.
How to Fix a Leaking Refrigerator Step-by-Step

How to Fix a Leaking Refrigerator Step-by-Step

Table of Contents

Why Is My Refrigerator Leaking Water?

A leaking fridge can happen for a few simple reasons. Before trying to fix it, let’s see why it might be leaking.

  • Clogged or frozen defrost drain: Water can back up if the drain gets blocked by food or ice.
  • Damaged water supply line: Cracks or loose connections can leak water.
  • Cracked drain pan: If the pan under your fridge is cracked, water will spill onto the floor.
  • Bad door gaskets: Doors that don’t seal properly cause condensation, leading to leaks.
  • Fridge not level: Water might not drain properly if the fridge isn’t sitting level.

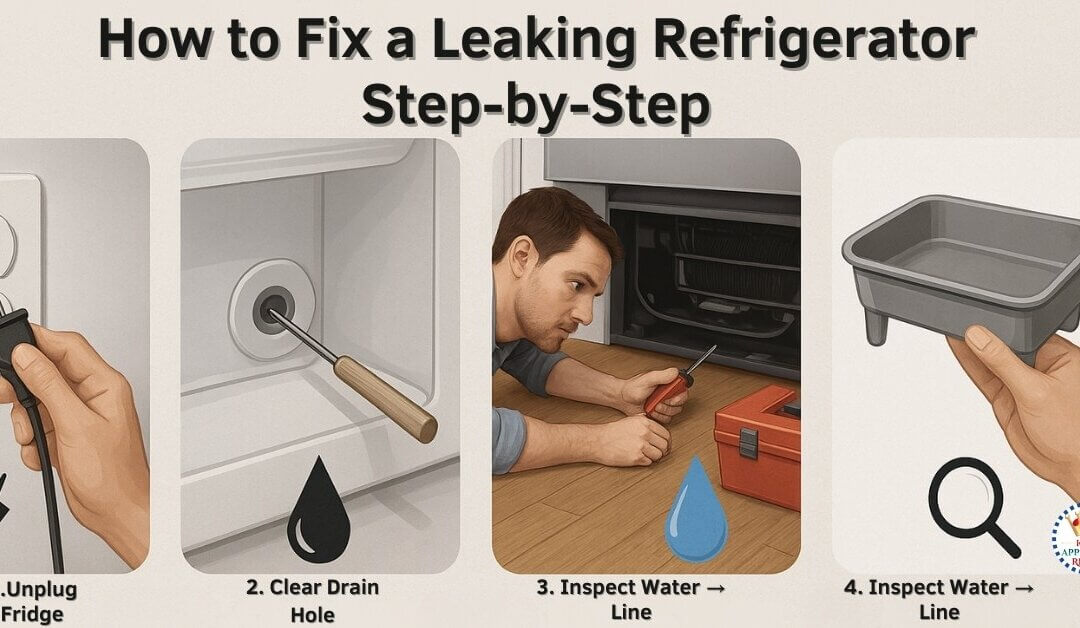
Step 1: Unplug and Inspect

Safety comes first! Always unplug your refrigerator before starting any repair. Move it away from the wall to check behind and underneath for water, loose hoses, or cracks in the pan.

Step 2: Check and Clear the Defrost Drain

A clogged defrost drain is a very common cause of leaks.

  1. Find the drain inside the freezer, near the back wall.
  2. Clear away any ice or food blocking it.
  3. Flush warm water through the drain using a turkey baster or funnel.
  4. If needed, use a pipe cleaner to remove stubborn clogs.

Tip: A little baking soda in warm water helps clean drains better!

Step 3: Inspect the Water Supply Line

If your fridge has a water dispenser or ice maker, check the water line. Look for cracks, leaks, or loose connections. Shut off the water valve before fixing or replacing the line.

Step 4: Examine and Replace the Drain Pan

The drain pan collects water and allows it to evaporate. If it is cracked or overflowing, it will leak. Slide out the pan and inspect it. If it’s damaged, replace it with a new one.

Step 5: Inspect Door Gaskets and Seals

Damaged door gaskets cause air leaks, making your fridge work harder and form excess moisture. Clean the gaskets with warm soapy water. If they are torn, it’s time to replace them.

Check out our guide on how to fix a refrigerator door that won’t close properly.

Step 6: Level the Refrigerator

If your fridge tilts forward, water might not drain right. Use a bubble level on top of the fridge and adjust the legs until it slightly tilts backward. This small fix often stops leaks!

Bonus Tip: Regular Maintenance to Prevent Leaks

Keep your fridge running smoothly by doing a little maintenance:

  • Flush the defrost drain every 6 months.
  • Check the water line once a year.
  • Clean the door gaskets every month.
  • Wipe the drain pan when you clean the fridge coils. (Learn how to clean fridge coils easily.)

When to Call a Professional

Sometimes, DIY repairs aren’t enough. If your fridge is still leaking, or you notice heavy water damage, it’s smart to call a pro.

King Appliance Repair Company offers expert refrigerator leaking water repair in Ottawa and nearby areas.

Need help today? 📞 Call us at 613-699-1999 or 🌐 book your repair online!

Frequently Asked Questions (FAQ)

1. Why is my refrigerator leaking water inside?

Usually, it’s because of a clogged drain or bad door seals. Water backs up and pools inside the fridge.

2. Can I fix a leaking refrigerator myself?

Yes! Many small leaks are easy to fix by cleaning the drain, checking hoses, or leveling your fridge.

3. How much does it cost to repair a leaking refrigerator?

Minor fixes are cheap. But bigger repairs, like water line replacement, might need a professional. King Appliance Repair offers affordable service in Ottawa.

4. How do I unclog a refrigerator drain line?

Flush the drain with warm water. Use a turkey baster or small brush to push out clogs.

5. When should I call a professional?

If leaks continue after DIY fixes, or you see water leaking from behind the fridge, call a technician for help!

Final Thoughts

Fixing a leaking refrigerator isn’t always hard. Cleaning the defrost drain, tightening a hose, or adjusting the fridge’s level can stop many leaks fast.

Still have problems? Let the experts at King Appliance Repair Company help. We’re here to fix your fridge quickly and professionally!

And if you’re looking for the latest fridge options, don’t miss our best smart refrigerators guide for 2024.

echnician repairing a refrigerator, appliance repair service banner with key features: expert knowledge, quick service, fair prices, and customer-first approach. Contact details and website link included.
How to Repair a Washing Machine That Won’t Spin

How to Repair a Washing Machine That Won’t Spin

Table of Contents

Common Causes: Washing Machine Won’t Spin

If your washing machine drum isn’t spinning, several common issues could be the cause:

  • Lid Switch Failure: If the lid switch is faulty, the washer won’t spin. This safety feature prevents operation when the lid is open.
  • Drive Belt Damage: A worn or broken belt will stop the drum from spinning.
  • Motor Coupling Issues: If the motor coupling is worn out, it won’t transfer power to the drum.
  • Clogged Drain Pump: A clogged drain pump prevents water from draining, causing spin cycle failure.
  • Overloaded Washer: Too many clothes can make the drum unbalanced and stop it from spinning.

Step-by-Step Troubleshooting

Follow these steps to fix your washer’s spin cycle:

1. Check the Lid Switch (For Top-Load Washers)

  • Unplug the washer.
  • Find the lid switch under the lid.
  • Press and release it. If there’s no clicking sound, the switch may need replacement.

2. Inspect the Drive Belt

  • Unplug the washer and remove the panel.
  • Look for a loose, damaged, or broken belt.
  • If needed, replace the belt with a new one.

3. Examine the Motor Coupling

  • Remove the washer cabinet.
  • Check for a worn-out or broken motor coupling.
  • Replace if necessary.

4. Clear the Drain Pump

  • Disconnect the drain hoses.
  • Remove debris or clogs.
  • Reattach the hoses and test the washer.

5. Avoid Overloading

  • Load clothes evenly to prevent imbalance.
  • Run smaller loads and check if the spin cycle works.

DIY Washing Machine Repair Tips

Before attempting repairs, remember:

  • Unplug the washer before working on it.
  • Use the correct replacement parts.
  • Check your washer’s manual for model-specific instructions.

When to Call a Professional

Sometimes, DIY repairs aren’t enough. Call a professional if:

  • The washer still won’t spin after troubleshooting.
  • You need to replace major parts like the motor or transmission.
  • You prefer professional repair for safety and efficiency.

Preventive Maintenance Tips

Keep your washing machine in good condition with these tips:

  • Check belts, hoses, and fittings monthly.
  • Clean the drain filter and pump regularly.
  • Always balance loads to prevent drum stress.
  • Schedule an annual appliance check-up.

Conclusion

Fixing a washing machine that won’t spin can be simple if you follow the right steps. Start by checking the lid switch, drive belt, and drain pump. Regular maintenance and proper use will help prevent spin cycle problems. If DIY repairs don’t work, contact King Appliance Repair Company for expert assistance.


More Helpful Articles

A professional appliance repair technician fixing a front-loading washing machine with tools in a clean home environment.
How to Fix a Dishwasher That Leaves Dishes Dirty

How to Fix a Dishwasher That Leaves Dishes Dirty

Introduction

Have you ever opened your dishwasher only to find food stuck on your dishes? That can be annoying, especially if you rely on your machine to do the dirty work for you. A common complaint is a dishwasher not cleaning dishes. In this easy-to-read guide, we will explore simple steps for dishwasher troubleshooting so you can fix dishwasher cleaning issues and get sparkling dishes again!

1. Check and Clean the Filter

Most dishwashers have a filter that catches small pieces of food. If it gets clogged, water cannot flow properly, causing dirty dishes after washing.

  1. Remove the bottom rack to see the filter at the base.
  2. Twist or lift the filter out. Be careful—check your manual if you are unsure.
  3. Rinse it under warm water and scrub away any debris with a soft brush.
  4. Put the filter back in its place properly.

2. Clean the Spray Arms

Spray arms shoot water around the dishwasher. If their tiny holes are blocked, your dishes might not get fully clean.

  1. Take out the spray arms. They may clip or screw off.
  2. Rinse them under warm running water.
  3. Use a toothpick or small brush to clear any stuck food bits.
  4. Reattach the spray arms when finished.

3. Check the Water Temperature

Hot water helps break down grease and stuck-on food. Ideally, your water should be between 120°F and 140°F (49°C–60°C).

  • Before starting the dishwasher, run hot water in the sink for a minute to warm up the pipes.
  • Use a thermometer to test how hot the water gets. If it’s too cool, increase your water heater setting (ask an adult for help if you’re not sure).

4. Use the Right Detergent

Using too much or too little soap can leave dishes dirty. Always follow the instructions on your dishwasher and detergent package.

  • Pick a high-quality detergent made for your dishwasher.
  • Measure it carefully—using more is not always better.
  • Store detergent in a dry place, so it stays fresh.

5. Load the Dishwasher Correctly

Sometimes, how you place your dishes can cause problems. If items block the spray arms or are jammed too tightly, water may not reach everything.

  • Leave enough space between plates and bowls so water can pass through.
  • Place bigger pots around the edges to avoid blocking the center spray.
  • Angle cups and glasses so water can drain off easily.

6. Run a Cleaning Cycle

Over time, dishwashers can get mineral buildup or smell bad. A cleaning cycle can remove these issues.

  1. Run the dishwasher empty with a dishwasher cleaner or a cup of white vinegar on the top rack.
  2. Use the hottest setting to break down grime.
  3. Wipe the inside afterward, especially the door edges and seals.

7. Get Professional Help

If you have tried these steps and your dishes still come out dirty, you might need expert assistance. Visit our Dishwasher Repair Ottawa page to learn more about how we can help. Our team at King Appliance Repair Company can fix tough problems like faulty pumps or blocked hoses.

Conclusion

A dishwasher not cleaning dishes is a common issue, but you can often solve it by cleaning filters, spray arms, and making sure the water is hot enough. Using the right amount of detergent and loading your machine correctly also helps prevent dirty dishes after washing. If all else fails, deciding between DIY and professional repairs is important. You can also check these useful tips to keep your other appliances in top shape:

Keeping all your appliances in good condition makes home life easier. With these dishwasher maintenance tips, you can enjoy sparkling clean dishes and fewer headaches in the kitchen!

echnician repairing a refrigerator, appliance repair service banner with key features: expert knowledge, quick service, fair prices, and customer-first approach. Contact details and website link included.
Clean Fridge Coils for Better Efficiency | Easy Guide

Clean Fridge Coils for Better Efficiency | Easy Guide

Table of Contents

Having a refrigerator that runs smoothly is important for keeping your food fresh and your energy bills low. One of the easiest ways to take care of your fridge is to clean refrigerator coils regularly. But first, let’s learn what these coils are. They are thin, tube-like parts usually located either behind or under your fridge. They help remove heat from inside the fridge so your food stays cool. Over time, dust and pet hair can build up on these coils, making your fridge work harder.

Why Clean Your Fridge Coils

Dirty coils stop your fridge from getting rid of heat properly, which can lead to higher electricity bills and a shorter lifespan for your appliance. By making a habit of this simple task, you’ll improve fridge efficiency and avoid expensive repairs. Plus, a well-cared-for fridge is less likely to break down. If your fridge is already acting up, check out our Fridge Repair Ottawa service for professional help.

How to Clean Refrigerator Coils

  1. Unplug the Fridge: Safety is key. Switch off the power or unplug your fridge so you don’t risk electric shock.
  2. Find the Coils: Refer to your manual or look at the back or bottom of the fridge. Some models have a panel or grille you need to remove first.
  3. Brush and Vacuum: Use a soft brush or coil-cleaning tool to get rid of dust. A vacuum with a hose attachment can suck up loosened dirt. This step is a classic bit of DIY fridge cleaning that pays off in the long run.
  4. Check for Damage: If anything looks bent or broken, you might want to call an expert. Learn more about deciding between fixing things yourself or calling in a pro with our article on DIY vs Pro Appliance Repairs.
  5. Put It All Back: Once the coils are dust-free, reattach any panels and plug your fridge back in. Slide it into place, and you’re all set!

Extra Fridge Maintenance Tips

  • Wipe Spills Quickly: Clean up spills before they become sticky and smelly.
  • Don’t Overfill: Good airflow is crucial. If your fridge is packed, cold air can’t move around well.
  • Check Temperature Settings: The ideal fridge temperature is around 37-40°F (3-4°C). This keeps food fresh without using too much energy.
  • Keep the Door Seals Healthy: If the seals are loose, your fridge will lose cold air. Need more appliance advice? Check our freezer maintenance tips to save even more energy.

For other handy fixes, explore how to swap out a worn bulb in your oven with our guide on replacing a worn-out oven light. Keeping all appliances in top shape will make your kitchen more efficient overall.

When to Call a Professional

If cleaning the coils doesn’t solve your fridge troubles or you notice strange noises, leaks, or frequent cycling on and off, it’s wise to call in an expert. At King Appliance Repair Company, we can help diagnose deeper issues. If your washing machine is acting up, we also have tips on unclogging your washing machine drain quickly.

Conclusion

By remembering to clean condenser coils a few times a year, you’re practicing the best fridge maintenance tips around. Not only will you improve fridge efficiency, but you’ll also save on energy bills and avoid sudden breakdowns. If you ever feel unsure about these steps or run into major fridge problems, don’t hesitate to contact King Appliance Repair Company for fast, friendly help. A clean, well-cared-for refrigerator will serve you and your family better for many years to come.

echnician repairing a refrigerator, appliance repair service banner with key features: expert knowledge, quick service, fair prices, and customer-first approach. Contact details and website link included.
Easy Ways to Unclog Your Washing Machine Drain Fast

Easy Ways to Unclog Your Washing Machine Drain Fast

Table of Contents

Easy Ways to Unclog Your Washing Machine Drain Fast

A washing machine that will not drain can be a big headache. Dirty water may stay inside the drum, making your clothes soggy and your laundry room messy. The good news is that you can often fix this problem yourself, even if you are not a repair expert. In this article, we will show you simple ways to unclog washing machine drain lines quickly, so you can get back to your normal laundry routine without too much trouble.

We will also share tips on how to avoid clogs in the future. If you would like to learn more about fixing appliances on your own, or when it is best to call a professional, check out our helpful guide on
DIY vs Pro Appliance Repairs: What You Need to Know.

Why Washing Machine Drains Get Clogged

Over time, lint, dirt, and small items can build up inside your washing machine’s drain system. These things might come from pockets (like coins or hairpins), or they can come from fibers that break off clothes. When too much gunk collects, water cannot flow out of the machine properly.

In some cases, bigger objects, like socks or small towels, can get stuck in the drain hose or drain pump. This will cause a washing machine drainage problem. Understanding the main causes of clogs can help you avoid them in the future.

Signs of a Clogged Drain

It can be easy to tell when you have a washing machine not draining water as you will see water still in the drum at the end of a cycle. However, there are other signs, too:

  • Slow Draining: The water leaves the drum, but very slowly.
  • Foul Smells: Stale water can sit in the hose or filter, causing bad odors.
  • Gurgling Noises: Strange sounds can mean the water is fighting against a blockage.
  • Leaks: Water may spill out onto the floor if the drain is blocked.

If you see any of these clues, you likely need to learn how to fix a clogged washer drain before it gets worse.

Steps to Unclog Your Washing Machine Drain

1. Turn Off and Unplug Your Washer

Safety always comes first. Switch off the power and unplug the machine. If you have a front panel or an access door, open it up so you can reach the drain pump or filter.

2. Locate the Drain Pump Filter

Many washers have a small door near the bottom front. Behind this door, you will find the drain pump filter. This filter often catches coins, lint, and other small objects. Carefully remove the filter and pull out any debris you see. Have a towel or bowl ready to catch water that might spill out.

3. Check the Drain Hose

If cleaning the filter does not help, the next step is to clear washing machine drain hose blocks. Move the washer away from the wall, then find the hose that drains water out. You can use pliers to gently loosen the clamp that holds the hose in place. Once the hose is off, look inside for any clogs.

If you find clumps of lint or small objects, remove them by hand or with a small brush. For stubborn clogs, you can use a drain snake or a similar tool to pull out the blockage.

4. Reattach and Test

After you are sure the hose is clear, put everything back in place. Make sure clamps and fittings are tight to stop leaks. Plug the washer back in and run a quick rinse cycle to see if the water now drains properly.

If your washer still does not drain, the drain pump itself might be the problem, or a part could be broken. You might want to consider professional help, such as
Washer Repair Ottawa services, if you live nearby.

Maintenance Tips to Prevent Future Clogs

Keeping your washer free of clogs is not hard if you follow simple steps:

  • Clean the Filter Regularly: Check the pump filter at least once a month.
  • Empty Pockets: Before loading clothes, make sure no small items are inside pants or jacket pockets.
  • Use Good Detergent: High-quality detergents leave less residue behind. This helps prevent blockages.
  • Run Hot Water Cycles: From time to time, run a hot wash (with no clothes) to break down soap and dirt buildup.
  • Leave the Door Open: After each wash, keep the washer door or lid slightly open so the drum dries and smells stay away.

For more appliance care ideas, check out our post on freezer maintenance tips. You can also learn how to replace a worn-out oven light quickly if you want to keep your kitchen gear in top shape.

When to Call a Professional

If you have tried everything and your washing machine drain is still clogged, it is probably time to call an expert. Deeper or more complex issues may need special tools or replacement parts. A qualified repair technician can check your washer and fix whatever is wrong.

For instance, if you have issues with your dryer as well, you might want to learn
how to safely remove lint from your dryer vent. Preventing clogs in all your appliances can save you from big problems later.

Deciding between a do-it-yourself fix and a pro service can be tough. If you are unsure, you can read our guide on DIY vs Pro Appliance Repairs: What You Need to Know to help you make the right choice.

Conclusion

A clogged washer can cause stress, but you can often fix it yourself by finding and removing built-up lint, dirt, or small items. By learning how to unclog washing machine drain lines and taking simple steps to avoid future clogs, you will keep your washer running well.

Remember to clean filters, check hoses, and run a hot cycle every so often. If your machine still will not drain or if you suspect a bigger problem, it may be best to contact a professional. Keeping your appliances in good shape can help you save time, money, and frustration in the long run.

A professional appliance repair technician fixing a front-loading washing machine with tools in a clean home environment.